Deploying with Kubernetes
If you need to migrate from the Docker version to the Kubernetes version, please refer to this document.
The SwanLab Python SDK version supported by the Kubernetes version is >= 0.7.4
If you want to use Kubernetes for self-hosted deployment of SwanLab, please follow the installation process below.
![]()
Resources and Concepts:
- SwanHubX/charts: SwanLab's Kubernetes Helm Chart repository
self-hosted: The deployed SwanLab Kubernetes cluster
Prerequisites
To deploy the self-hosted version of SwanLab using Kubernetes, please ensure your Kubernetes and related infrastructure meet the following requirements:
| Software/Infrastructure | Version/Configuration Requirement | Necessity Explanation |
|---|---|---|
| kubernetes | v1.24 and above | Official testing and validation cover v1.24+ versions. To ensure API compatibility and system stability, it is not recommended to deploy in clusters with versions lower than this. |
| helm | version>=3.9 | SwanLab Chart packages require features from Helm v3.9 or newer, and are not compatible with earlier versions or Helm v2 (Tiller mode). |
| RBAC Permissions | Namespace Admin | The deploying account needs to have write permissions within the current namespace. Core resources include: Deployment, StatefulSet, Service, PVC, Secret, ConfigMap, etc. |
| Network Access (Egress) | *.swanlab.cn | Cluster nodes need to have the ability to access the public internet (or have a configured NAT gateway): 1. repo.swanlab.cn: Used to pull application images.2. api.swanlab.cn: Used for online License activation and validation. |
1. Quick Start
You can install the K8S version of the SwanLab self-hosted service via helm.
First, add the local repository mapping:
helm repo add swanlab https://helm.swanlab.cnThe swanlab repository will contain all official open-source Charts from SwanLab. You can install the SwanLab self-hosted service with the following command:
helm install swanlab-self-hosted swanlab/self-hostedTip
You can view all configurable options for self-hosted here. Meanwhile, we recommend that you save your values.yaml.
By installing swanlab/self-hosted (referred to below as self-hosted), you can install the self-hosted version of the SwanLab application on k8s. The installation results will be printed in the terminal:
Release "swanlab-self-hosted" has been upgraded. Happy Helming!
NAME: swanlab-self-hosted
LAST DEPLOYED: Sat Dec 13 17:52:05 2025
NAMESPACE: self-hosted
STATUS: deployed
REVISION: 6
TEST SUITE: None
NOTES:
Thank you for installing self-hosted!

Get the application URL by running these commands:

1. Access via kube-proxy:
   Run the following command to forward your local port 8080 to the service:
     kubectl port-forward --namespace self-hosted svc/swanlab-self-hosted 8080:80

   Then, you can access the service via:
     http://127.0.0.1:8080

2. Expose Service Externally:
   SwanLab self-hosted is not exposed to the public internet.
   If you wish to expose this service, you need to configure a LoadBalancer manually or use an Ingress Controller.

   Please refer to the official documentation for configuration details:
   https://docs.swanlab.cn/guide_cloud/self_host/kubernetes-deploy.html
As shown above, self-hosted cannot be directly accessed via an external network by default. You can access this service locally using the port-forward functionality. If you wish to enable external access (via IP or domain name), please refer to 3.6 Configuring the Application Access Entrypoint.
Here is an example of accessing it locally; open a terminal and execute:
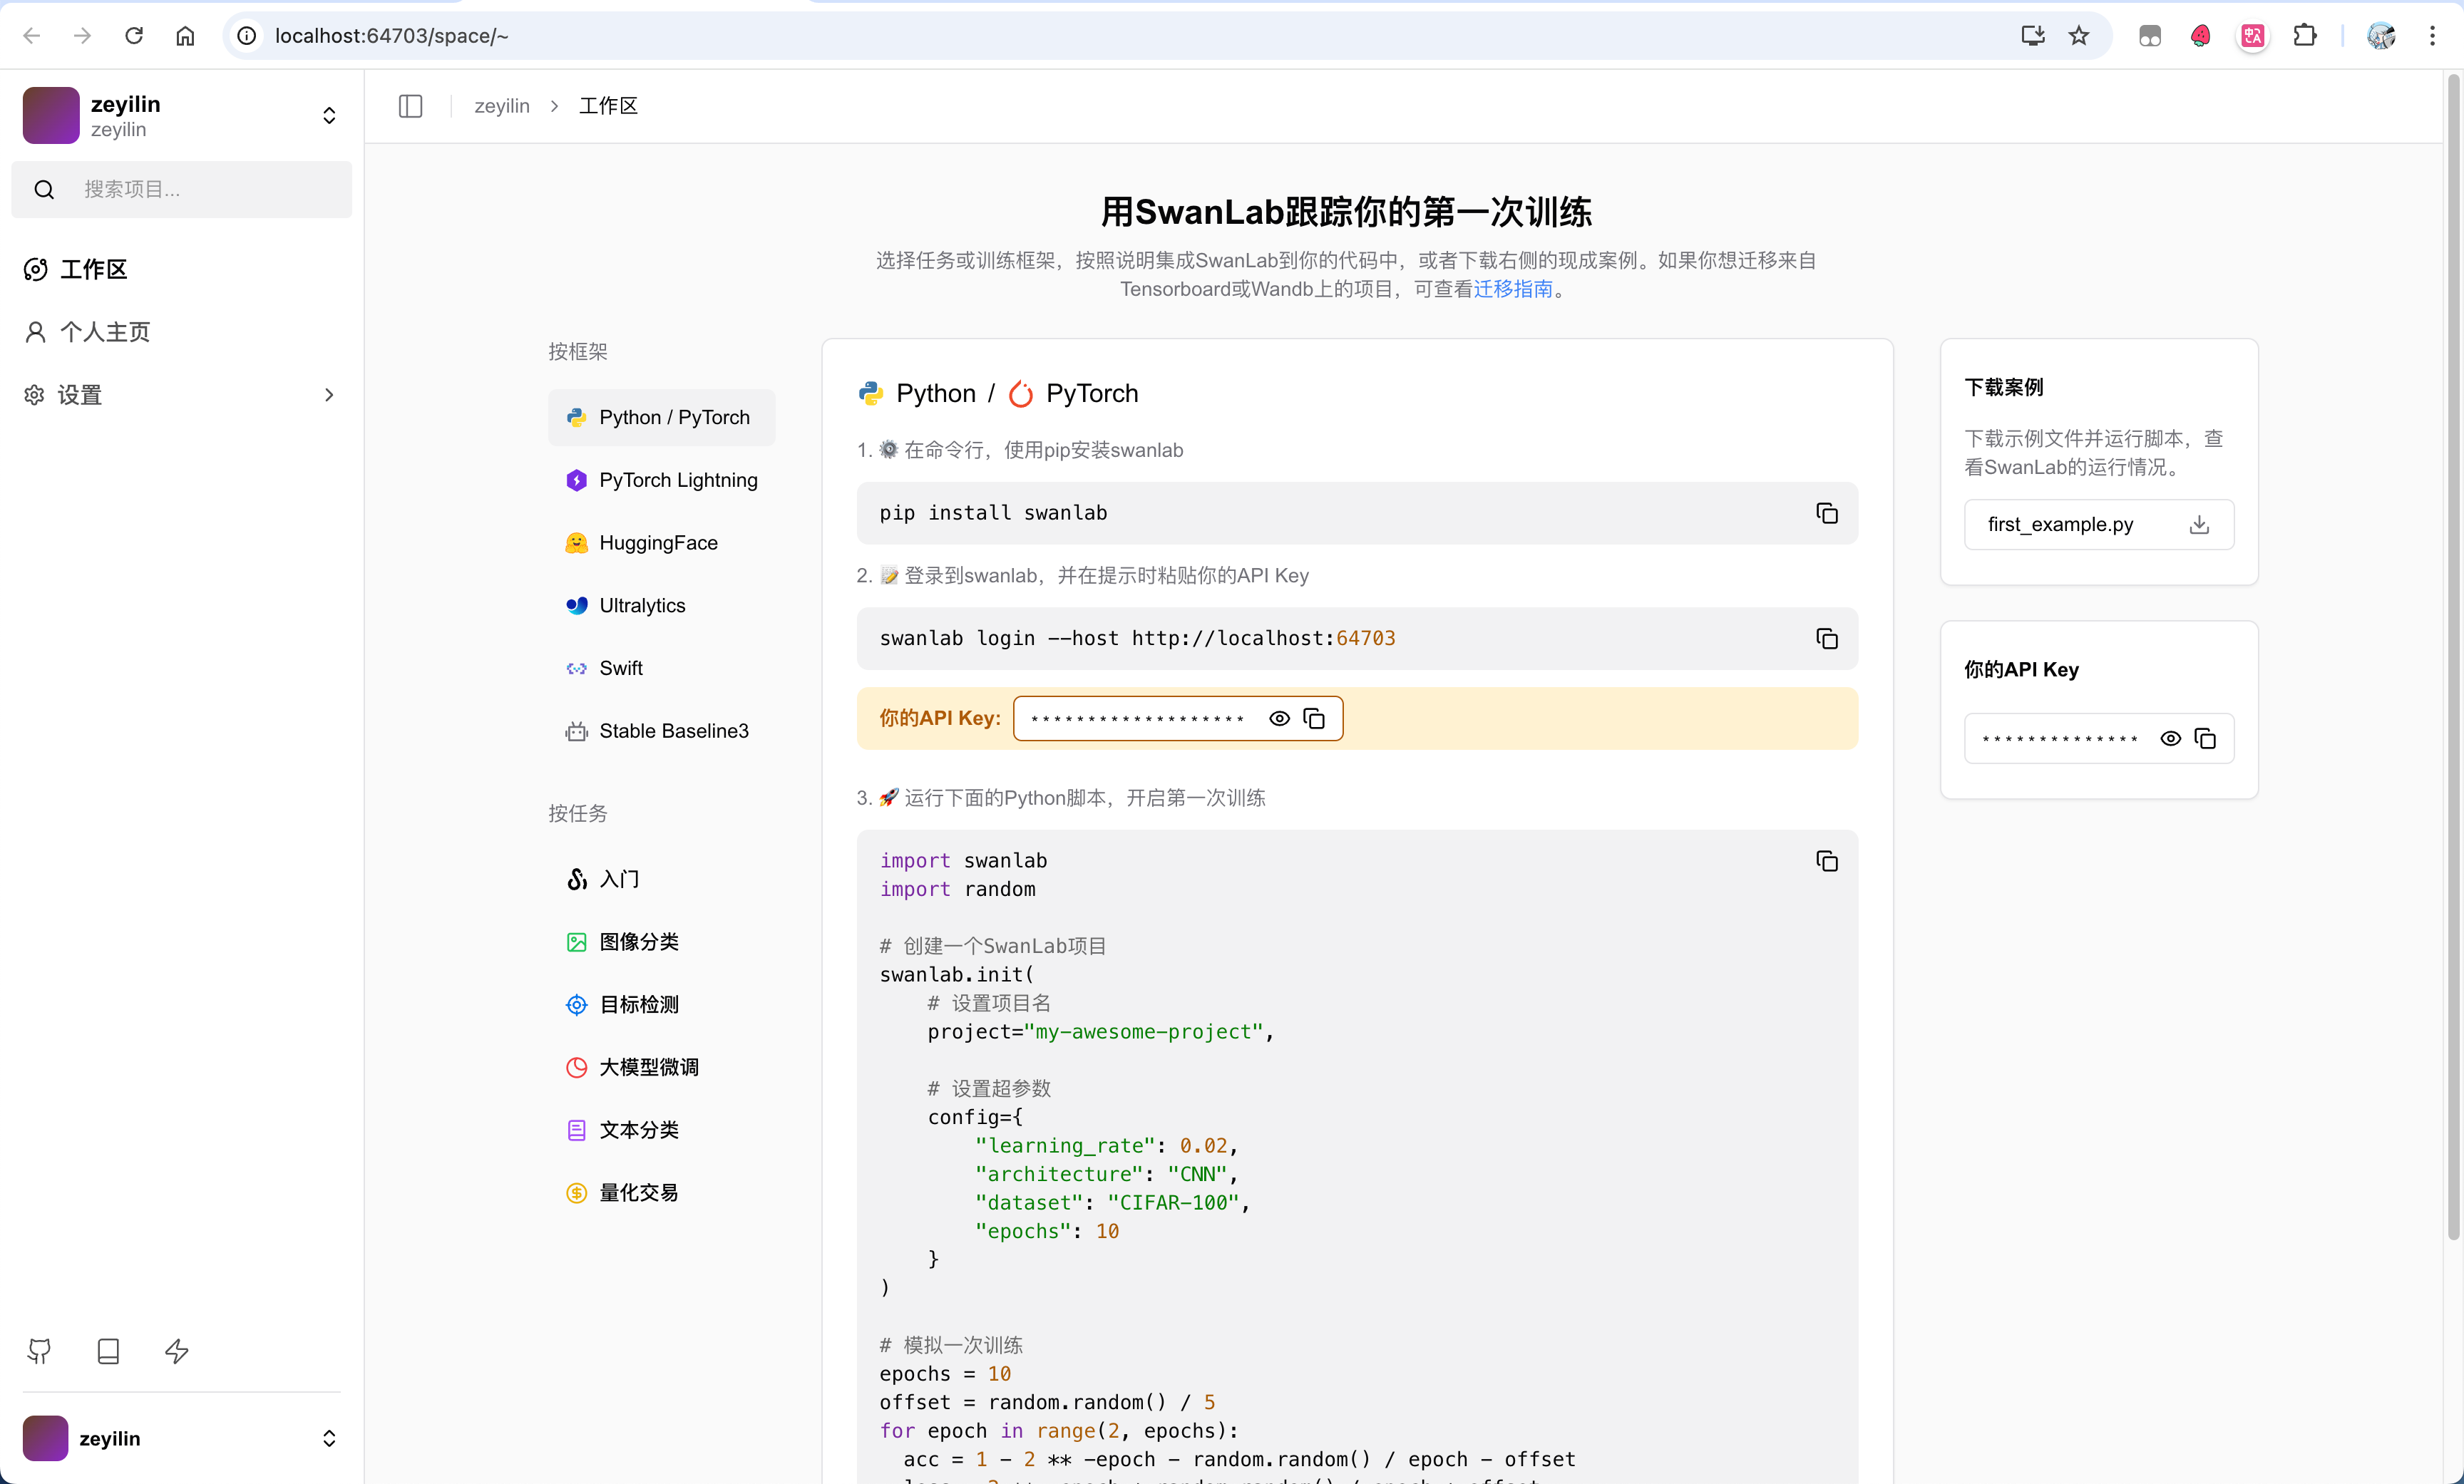
kubectl port-forward --namespace self-hosted svc/swanlab-self-hosted 8080:80Then you can access it in your browser at: http://127.0.0.1:8080 to see the SwanLab page:
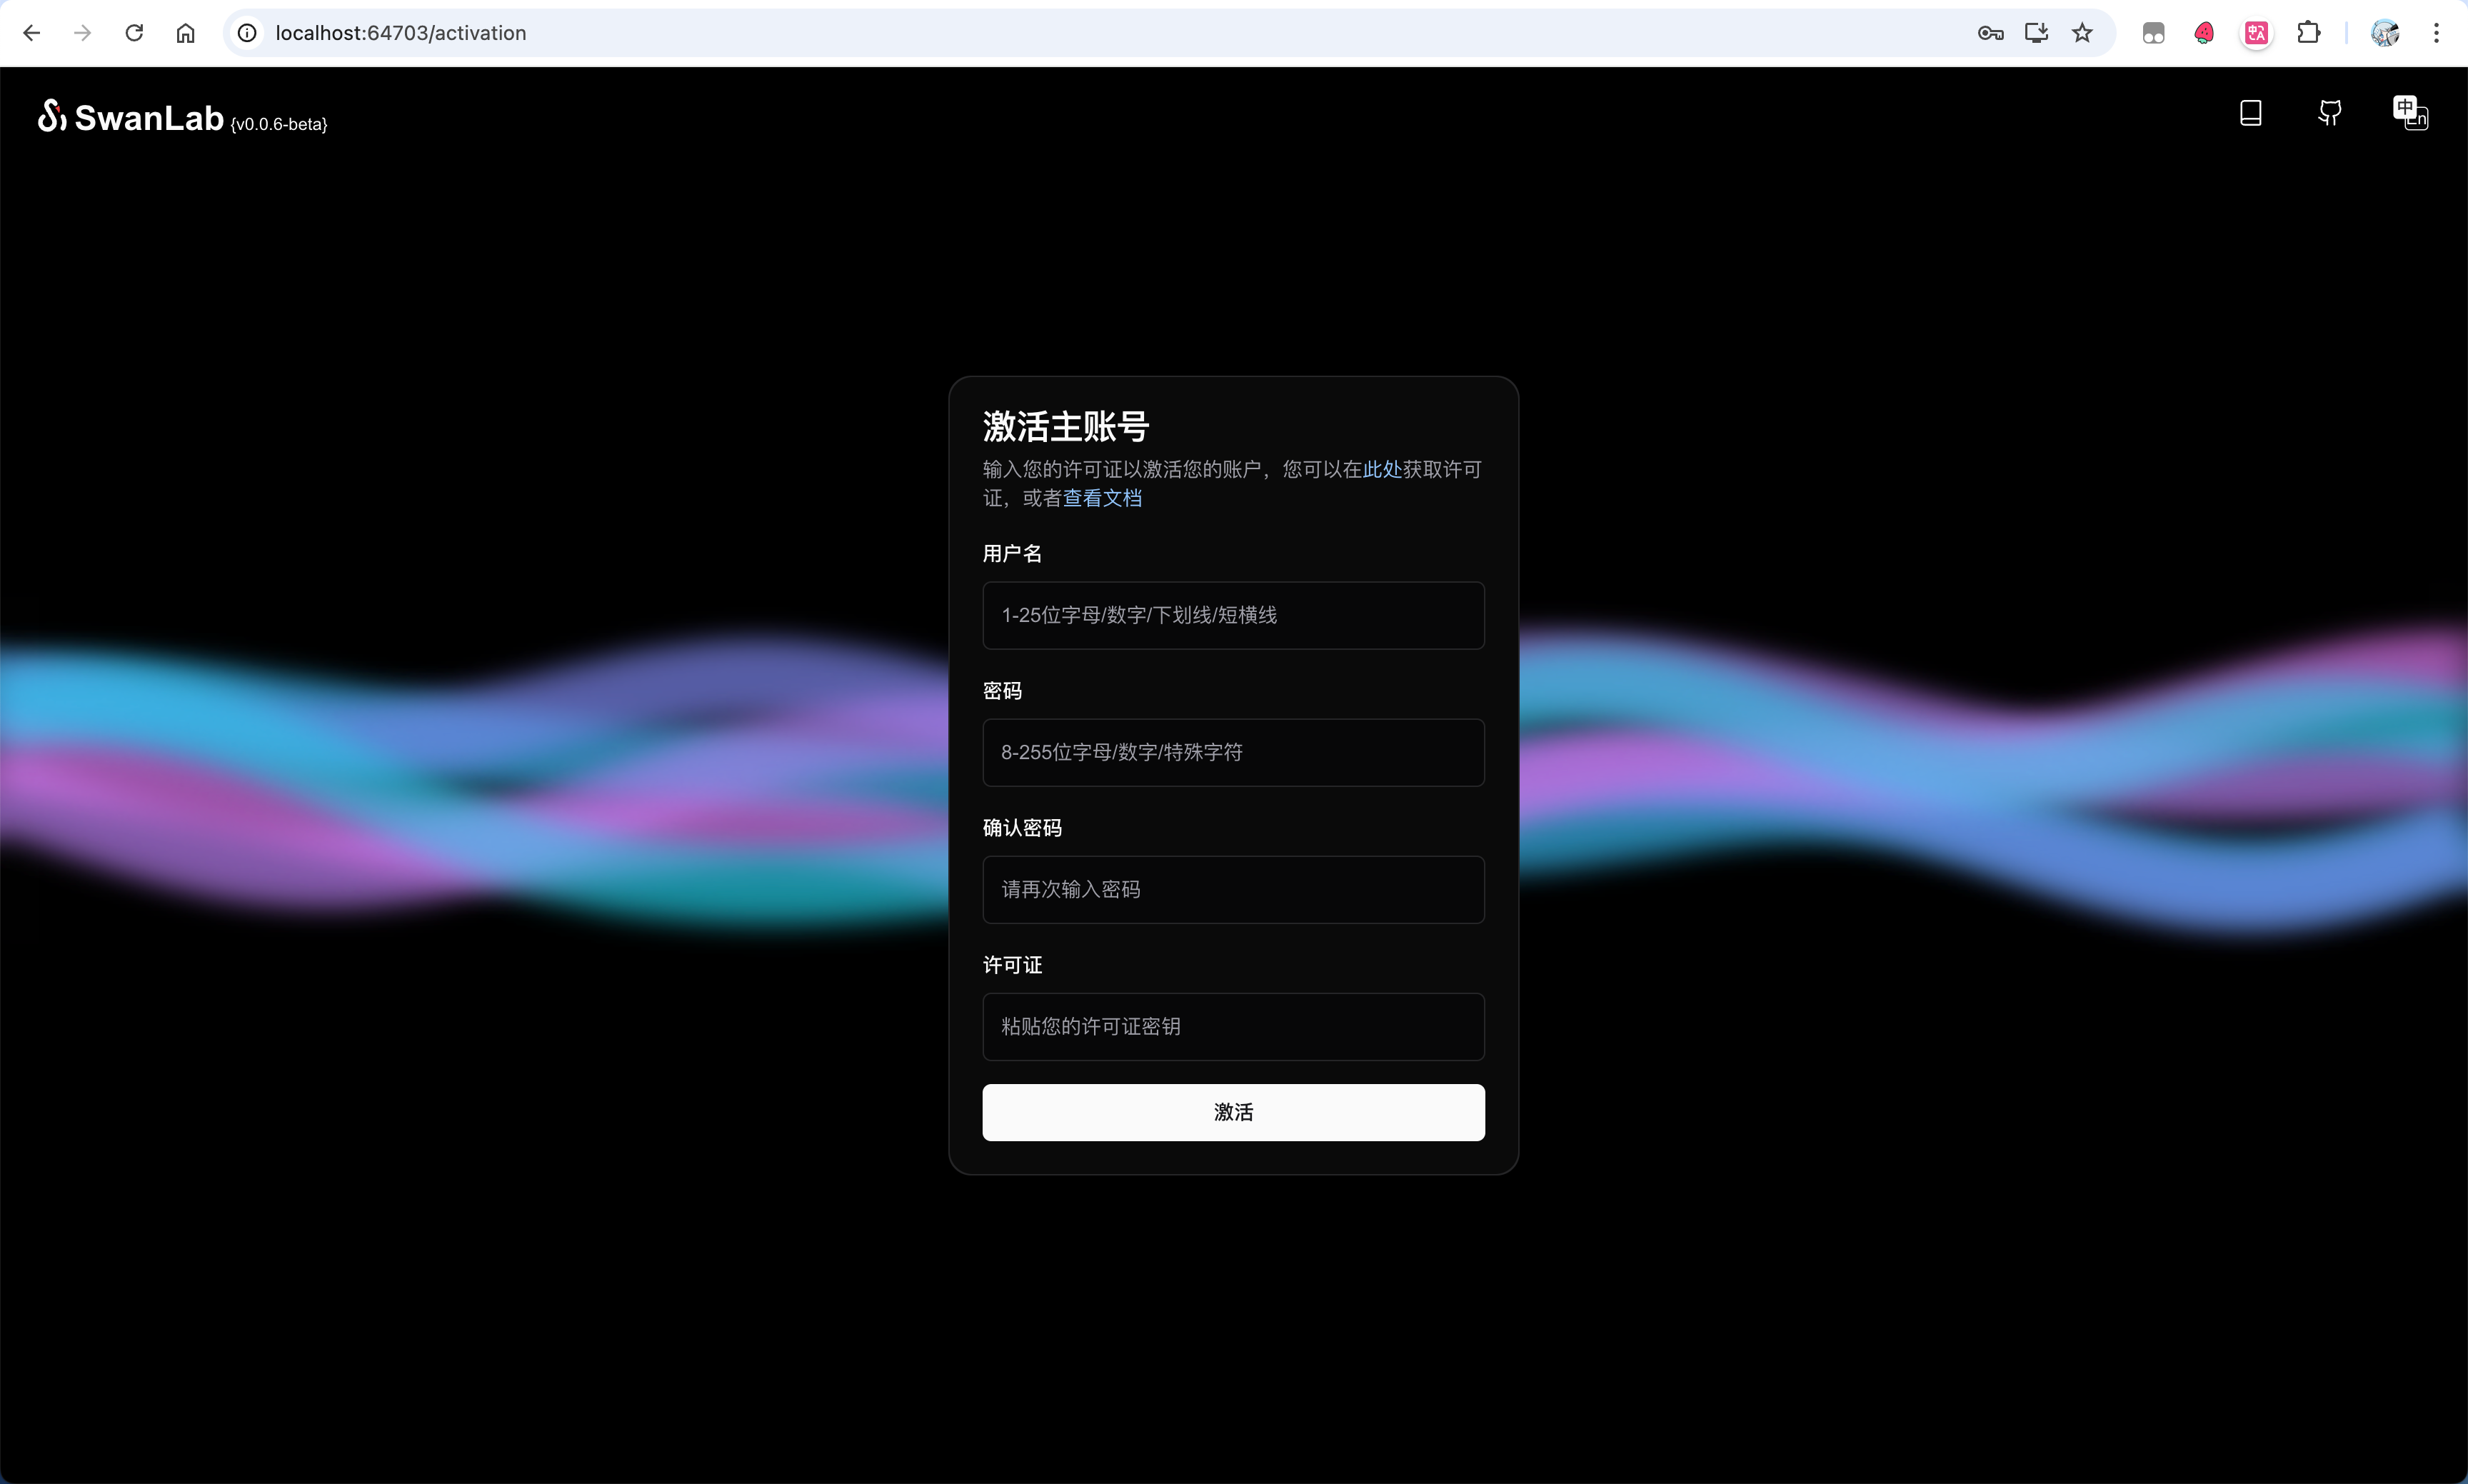
Now, you need to activate your main account. Activation requires 1 License. For personal use, you can apply for a free one on the SwanLab official website under 「Settings」-「Account & License」.
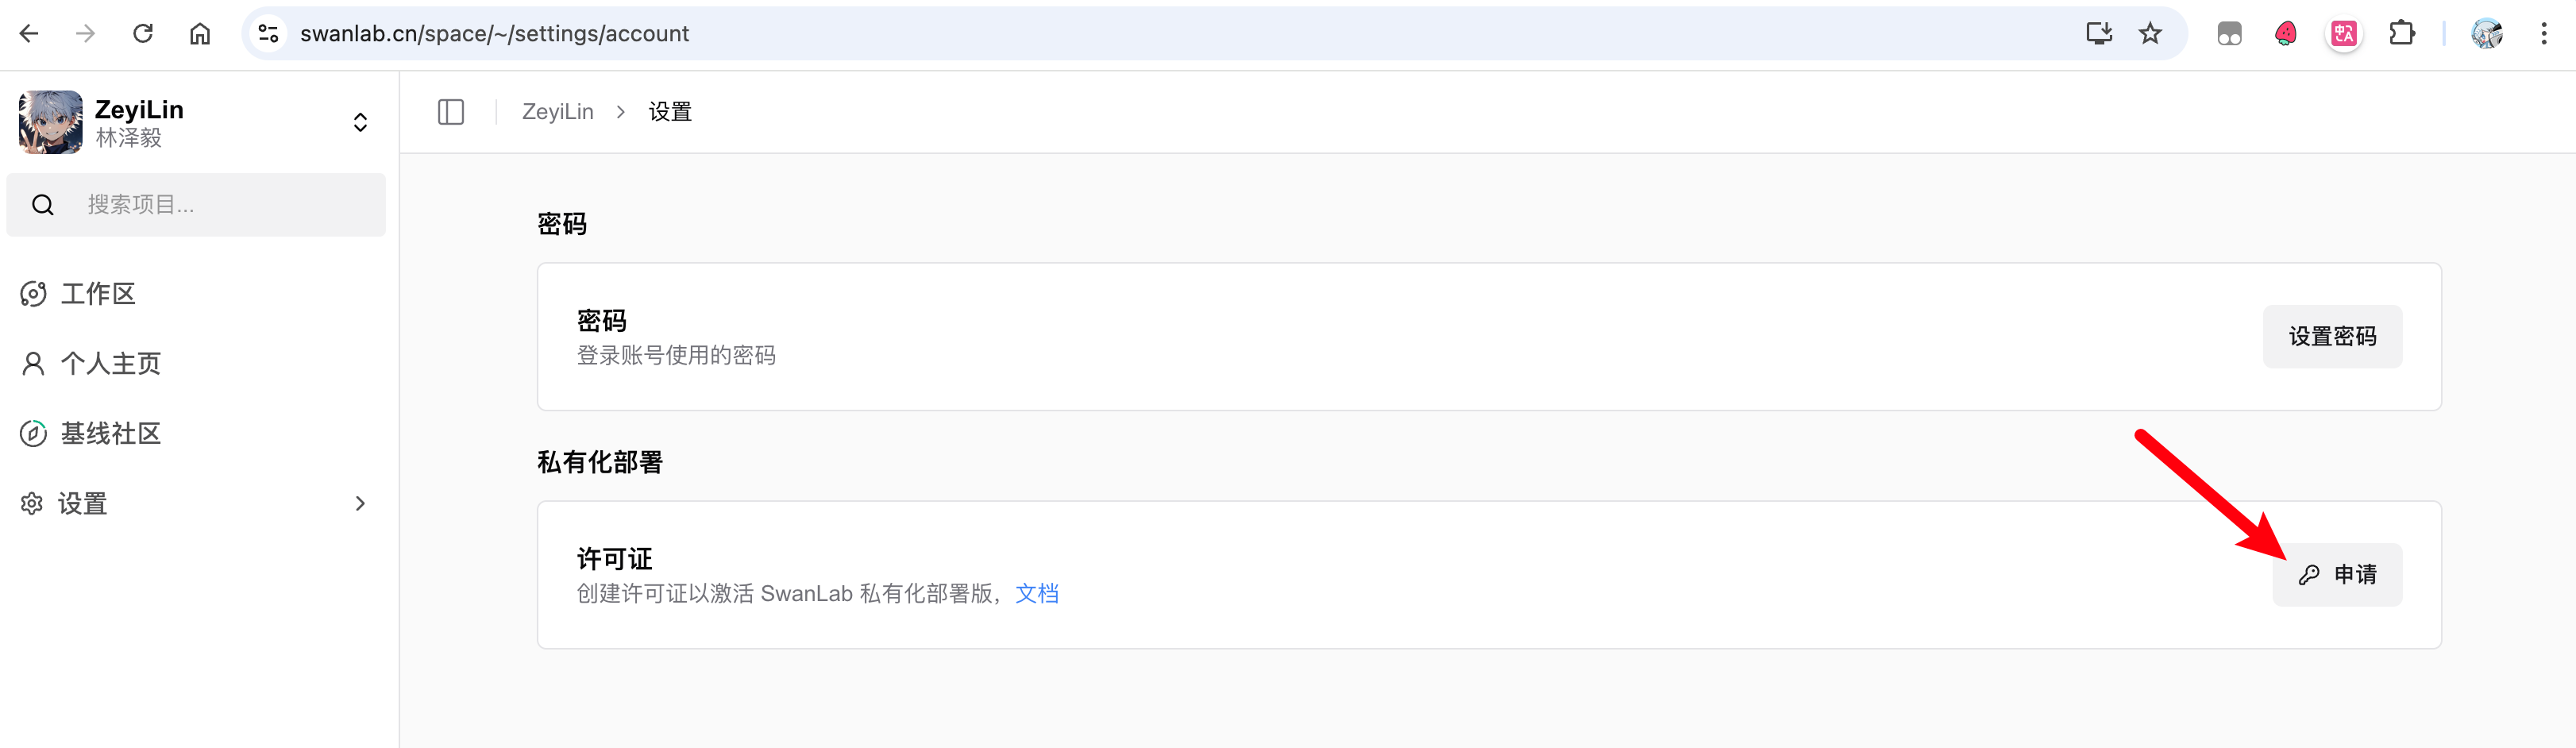
After obtaining the License, return to the activation page, fill in the username, password, confirm password, and License, then click activate to complete the creation.
2. Resource Inventory
To help you better understand the service status of SwanLab, this section will list all deployment resources included in the SwanLab service operation and their corresponding characteristics. self-hosted roughly contains two types of resources: basic service resources and application service resources.
2.1 Basic Service Resources
Basic service resources refer to necessary resources that the SwanLab application depends on, such as databases, object storage, etc. They include:
- PostgreSQL Single Instance: Stores SwanLab core data.
- redis Single Instance: Stores service cache.
- clickhouse Single Instance: Stores experiment log resources.
- minio Single Instance: Stores media resources.
- traefik Single Instance: Gateway and application entrypoint.
2.2 Application Service Resources
Application service resources refer to SwanLab's core business resources — the images for these services will change with self-hosted version updates. They include:
- SwanLab-Server: SwanLab core backend service.
- SwanLab-House: SwanLab metric calculation and analysis service.
- SwanLab-Cloud: SwanLab frontend display component.
- SwanLab-Next: SwanLab frontend display component.
- Traefik-Proxy: Gateway component based on Traefik.
Typically, you can freely modify the replica count of these application service resources. All configurable fields can be obtained with the following command:
helm show values swanlab/self-hosted3. Configuring Custom Resources
You can view all configurable items for self-hosted here. This section will explain some commonly used and SwanLab-officially-recommended configuration practices.
3.1 Customizing Basic Service Resources
As you can see, all basic services deployed by self-hosted are single instances. If you are seeking enterprise-level stability, this may not meet your needs. Therefore, self-hosted supports linking to external basic service resources — you can configure them via the integrations section. Next, we will explain how to use various basic service resources.
We have written detailed comments and key data structure explanations in values.yaml. Note that if you enable any integrated basic service resource (e.g., set integrations.postgres.enabled to true), the single-instance service deployed by self-hosted will be destroyed.
3.1.1 Postgres
If you wish to use your own deployed cnpg cluster or a cloud provider's service, you simply need to:
- Set
integrations.postgres.enabledtotrue. - Create a Secret and pass its name via
integrations.postgres.existingSecret. The secret should contain the following information:
.data.<keys> | Explanation |
|---|---|
username | Read-write username. |
password | Read-write user password. |
primaryUrl | Read-write database connection string, format similar to: postgresql://{username}:${password}@postgres:5432/app?schema=public. |
replicaUrl | Read-only database connection string, generally used for load balancing and identical to primaryUrl except for credentials. If a read-only user/cluster is not configured, the read-write connection string can be used instead. |
- Configure other settings for
integrations.postgresviavalues.yaml.
Final configuration example:
integrations:
  postgres:
    enabled: true
    host: "example.postgres"
    port: 5432
    database: "app"
    existingSecret: integration-postgres
Please ensure the above configuration corresponds with the information in the secret.
3.1.2 Redis
If you wish to use your own deployed redis cluster or a cloud provider's service, you simply need to:
- Set
integrations.redis.enabledtotrue. - Create a Secret and pass its name via
integrations.redis.existingSecret. The secret should contain the following information:
.data.<keys> | Explanation |
|---|---|
url | Database connection string, format similar to: redis://{username}:${password}@redis:6379. |
- Configure other settings for
integrations.redisviavalues.yaml.
Final configuration example:
integrations:
  redis:
    enabled: true
    host: "example.redis"
    port: 6379
    database: "0"
    existingSecret: integration-redis
Please ensure the above configuration corresponds with the information in the secret.
3.1.3 Clickhouse
If you wish to use your own deployed clickhouse cluster or a cloud provider's service, you simply need to:
- Set
integrations.clickhouse.enabledtotrue. - Create a Secret and pass its name via
integrations.clickhouse.existingSecret. The secret should contain the following information:
.data.<keys> | Explanation |
|---|---|
username | Read-write username. |
password | Read-write user password. |
- Configure other settings for
integrations.clickhouseviavalues.yaml.
Final configuration example:
integrations:
  clickhouse:
    enabled: true
    host: "example.clickhouse"
    httpPort: 8123
    tcpPort: 9000
    database: "app"
    existingSecret: integration-clickhouse
Please ensure the above configuration corresponds with the information in the secret.
3.1.4 Object Storage
If you wish to use your own deployed minio cluster or a cloud provider's service (must be S3 protocol compatible), you simply need to:
- Set
integrations.s3.enabledtotrue. - Create a Secret and pass its name via
integrations.s3.existingSecret. The secret should contain the following information:
.data.<keys> | Explanation |
|---|---|
accessKey | Object storage access key. |
secretKey | Object storage secret key. |
- Configure other settings for
integrations.s3viavalues.yaml. Final configuration example:
integrations:
  s3:
    enabled: true
    public:
      ssl: true
      endpoint: "xxx.s3.com"
      region: "cn-beijing"
      pathStyle: false
      port: 443
      domain: "https://xxx.xxxx.s3.com"
      bucket: "swanlab-public"
    private:
      ssl: true
      endpoint: "xxx.s3.com"
      region: "cn-beijing"
      pathStyle: false
      port: 443
      bucket: "swanlab-private"
    existingSecret: integration-s3
Please ensure the above configuration corresponds with the information in the secret.
WARNING
- The permission for the publicBucket is public read, private write. The permission for the privateBucket is private read-write.
- When you choose a custom object storage service, please ensure your object storage service can be accessed directly from outside (via IP or domain name).
- Your object storage secret key must have write permissions and S3 signing permissions for both the publicBucket and privateBucket.
3.2 Customizing Storage Resources
If you wish to use the single-instance basic services deployed by self-hosted, we recommend that you declare your own storage-class to support data persistence.
Before customizing the storage class for basic resources, please ensure:
- The
integrationsare not enabled for this basic service resource. - Ensure your
storage-classorclaimexists in the cluster.
3.2.1 Storage Class for Basic Service Resources
For the definition of basic service resources, please refer to section 2.1 of this document.
You can configure basic service resources via the dependencies section. Taking postgres as an example:
- If you want
self-hostedto generate a PersistentVolumeClaim, you can configure thestorageClassandstorageSizeunderdependencies.postgres.persistenceto set the storage class type and size. - If you already have a PersistentVolumeClaim, you can configure an existing claim via
dependencies.postgres.persistence.existingClaim.
Typically, configuring dependencies.postgres.persistence.existingClaim is a recommended practice, as it ensures the storage resources are managed by you.
3.2.2 Storage Class for Application Service Resources
For the definition of application service resources, please refer to section 2.2 of this document.
Due to current technical limitations, swanlab-house is deployed as a StatefulSet, so you need to mount a PersistentVolume for it. Similar to configuring basic service resources, you need to configure the fields under service.house.persistence. Note that existingClaim is not allowed here.
WARNING
swanlab-house will store some metric intermediate products in the PersistentVolume. Generally, you do not need to care about the data in this volume. We plan to remove this design in the future.
3.3 Increasing Application Replicas to Improve Service Quality
We provide a replicas interface for all services under the service field. You can freely change their count. Based on SwanLab's operational experience, in most scenarios:
- The replica count for the
serverservice is 3. - The replica count for the
houseservice is 3. - The replica count for the
nextservice is 2. - The replica count for the
cloudservice is 1. Of course, application performance is a complex calculation metric, and it also typically depends on resource limits. We also provide interfaces such asresourcesto allow you to configure the resource usage of applications.
3.4 Changing Pod Anti-Affinity
You can set Pod anti-affinity to improve disaster recovery capabilities by setting global.podAntiAffinityPreset:
global:
  # Kubernetes Pod Affinity/Anti-Affinity settings
  # We use Topology Spread Constraints to achieve pod distribution across nodes.
  podAntiAffinityPreset: "soft" # soft, hard, or none
The default is soft, which means all Pods will be evenly distributed across Nodes. You can set it to hard to ensure Pods of the same service are not scheduled on the same Node, or set it to none to disable Pod anti-affinity.
3.5 Defining Declarations, Labels, and Other Metadata
For any service, we define the following interfaces to facilitate your scheduling of SwanLab application containers:
resources: Limits the CPU and RAM resources required by the service.customLabels: Custom application labels.customAnnotations: Custom application annotations.customTolerations: Custom tolerations.customNodeSelector: Custom node selector.
You can use these resources to freely manage and schedule SwanLab applications.
3.6 Configuring the Application Access Entrypoint
The domain name of the application service within the cluster is the release name you deployed. For example, assuming your cluster domain is cluster.local and the deployment command is:
helm install swanlab-self-hosted swanlab/self-hosted -n self-hosted- The domain name of the application within the
self-hostednamespace isswanlab-self-hosted. - The domain name of the application within the
kubernetescluster is:swanlab-self-hosted.self-hosted.svc.cluster.local
You can write your load balancing strategy based on the above information. It is generally recommended to prioritize using dedicated domain names (Host-based) to configure access policies to avoid routing conflicts caused by complex or changing path rules.
Based on the principle of architectural decoupling, Self-hosted does not have a built-in Ingress controller. You need to configure the external access entrypoint on the cluster's load balancer (or Ingress), which is also responsible for TLS termination (HTTPS offloading).
Regarding security policies, the application trusts all X-Forwarded-* request headers by default. If you need stricter header validation or forwarding control, be sure to implement it uniformly at the load balancing layer — this may affect the effectiveness of internal S3 signatures. If you use an external object storage service, you don't need to worry about this.
3.7 Changing the Domain Name Displayed in swanlab.login
By default, the login host displayed on the <Your Host>/space/~/quick-start page automatically uses the domain name <Your Host> you are currently using to access the frontend.
If you need to modify this value, you can specify it to your desired domain name by configuring global.settings.loginHost. Please note, this setting does not affect the actual backend service address; you need to configure the corresponding forwarding rules yourself.
3.8 Updating and Rolling Back Services
Update
We will update the helm chart version, which will include new features and bug fixes. You can choose to update your deployed service at an appropriate time.
WARNING
Before updating, please ensure you have backed up the corresponding PVC data!
You can run the following command to update your local repos, which should include the swanlab repo:
# Update repositories
helm repo update

# List all versions
helm search repo swanlab/self-hosted --versions
Then choose the version number you need to complete the update:
helm upgrade self-hosted swanlab-charts/self-hosted \
  --version x.x.x \
  -f my-values.yaml \
  --namespace xxx
Rollback
If the service fails to start after an update (e.g., CrashLoopBackOff), immediately roll back to the previous stable version with the following command:
helm rollback self-hosted x.x.x -n xxx3.9 Integrating with Prometheus
SwanLab's application services currently do not support integration with Prometheus. This feature is under development, please stay tuned!
4. FAQ
Does deploying the service require elevated permissions (such as deploying CRDs or Controllers)?
No.
Can the original service remain online during data migration?
The original service must be stopped during migration. If the original service is not stopped, data gaps will occur.
In such cases, you may consider using swanlab sync to upload data to the new service.
If the cluster cannot access the public internet, how can images be downloaded and updated?
You can manually download the swanlab service images and upload them to an internal image registry, including:
service.gateway.image: SwanLab gateway service, the entry point for the entire applicationservice.gateway.identifyImage: Auxiliary image for the SwanLab gatewayservice.helper: Used to assist with deploying SwanLab services; essentially a busybox imageservice.server.image: SwanLab backend service; image tag corresponds to the Chart AppVersionservice.house.image: SwanLab backend service; image tag corresponds to the Chart AppVersionservice.house.logImage: Auxiliary image for the swanlab-house serviceservice.house.fbImage: Auxiliary image for the swanlab-house serviceservice.cloud.image: SwanLab frontend service; image tag corresponds to the Chart AppVersionservice.next.image: SwanLab frontend service; image tag corresponds to the Chart AppVersiondependencies.postgres.image: Postgres database image (can be ignored if custom base services are used)dependencies.redis.image: Redis database image (can be ignored if custom base services are used)dependencies.s3.image: MinIO object storage image (can be ignored if custom base services are used)dependencies.clickhouse.image: ClickHouse database image (can be ignored if custom base services are used)
What storage components are used by SwanLab and what are their purposes?
All SwanLab storage components and their purposes are as follows:
service.house.persistence
Assists the SwanLab data writing service in achieving high availability and will be removed in future versions.
When performing service migration, this volume does not need to be migrated.dependencies.postgres.persistence
Used for Postgres database persistence (can be ignored if custom base services are used).dependencies.redis.persistence
Used for Redis database persistence (can be ignored if custom base services are used).dependencies.s3.persistence
Used for object storage service persistence (can be ignored if custom base services are used).dependencies.clickhouse.persistence
Used for ClickHouse database persistence (can be ignored if custom base services are used).